I have made lots of handbags over the years, and I find them a fun way to be creative when I don’t have a lot of time. I made some new ones recently and took a look at some older ones and here is a quick tutorial on the method I came up with to make them quick and easy. I found that if I completed each side of the bag, inside and out and then attach them it was easier to add pockets, handles etc.
I don’t use a pattern but decide what size I want and then cut a rectangular shape. I can then change the design if I want to but for this post I will keep this shape.
Like the large bag, if I want to use contrasting fabric I decide where and how much to use and this will determine the size I want.
The lining is next. I cut that the same size as the main body of the bag and decide how many pockets I want. I always use a zippered one and make a large one that I can divide.

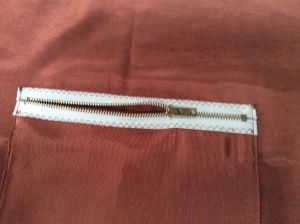
I finish three sides of the zippered one,and use the zipper to finish the top. It’s easy to attach it to the lining and as the fabric is double it makes for a strong pocket with no raw edges.
For the larger pocket on the other side of the bag I decide what size I want and cut lining double the finished width and the width of the bag. I fold it in half and sew the opposite long end and the short sides get included in the side seam at the end. I pin it to the lining a few ins. below the top and divide it however I want.
Adding Stability.
I use different products to add stability when needed. I use Peltex a lot, and any heavy sewin interfacing. I also use curtain lining as I always have that on hand. Canvas or other heavy cottons work really well too. I play around with whatever gives the support that I want.
I always add extra stability to the back of the pockets so I always keep my scraps for this purpose.

The next step is to attach whatever handles I am using and sandwich them between the lining and fabric. I find it really helpful to understitch the lining and this also helps to keep the handles in place. At this point you can add other pockets, maybe one for your cellphone and I also line to add a hook for my keys. Their is a lot of hardware available on the internet and you can make them as fancy as you like. At this point both sides of the bag are ready to be sewn together.

To finish the bag I open out the fabric and lining, put right sides together, and sew one continuous seam starting at the fabric end. Then I sew across the bottom of the main fabric and leave an opening in the lining to turn the bag right side out.
At this point I decide how wide I want the bottom of the bag to be and make a seam across the corner like this!

I do the same with the lining and before I close it I reach inside and sew these two short seams together and this prevents the lining from moving.

To finish off this bag I added the beading at the end. If you want to add ribbon, braid, or any detail you can do it while the sides are not joined. It would be easier as you are working on a flat surface.

On the medium bag I started out with an old piece of jewelry and quilting fabric. I auditioned small pieces of textiles until I liked how it looked. This us a fun way to use all those treasures that we all collect.
The smaller one is made from crushed velvet,taffeta, and a rayon home dec. fabric. I love to have the opportunity to add beading to my work. I also used knitting yarn for texture.
I have some more ideas that I want to explore so look for more soon.


Love these! And the tutorial is going into my bag of tricks! Thank you for the ideas. More please!
Fabulous.Explanation very clear.Thank you.
where did you get the handles?
I recycled them from an old bag. I originally bought them at Jo Ann, but a few yrs ago. Thanks for asking.
Pingback: Ichi and the Traveling Purse | West Zen Studio